mirror of
https://gitlab.com/game-loader/hugo.git
synced 2026-02-27 19:45:09 +08:00
214 lines
8.6 KiB
Markdown
214 lines
8.6 KiB
Markdown
---
|
||
title: 运维笔记
|
||
author: Logic
|
||
date: 2025-01-15
|
||
categories: [""]
|
||
tags: []
|
||
draft: false
|
||
---
|
||
|
||
## k8s 入门
|
||
|
||
安装minikube.略
|
||
|
||
安装kubectl, ubuntu直接使用snap即可. 方便快捷
|
||
|
||
minikube start 镜像拉取问题,
|
||
|
||
## 修复不同节点使用内网ip不互通的问题(异地组网)
|
||
|
||
### 修改master节点flannel配置文件
|
||
|
||
共修改两个地方,一个是args下,添加
|
||
|
||
args:
|
||
|
||
- --public-ip=$(PUBLIC_IP) # 添加此参数,申明公网IP
|
||
- --iface=eth0 # 添加此参数,绑定网卡
|
||
|
||
然后是env下
|
||
|
||
env:
|
||
|
||
- name: PUBLIC_IP #添加环境变量
|
||
valueFrom:
|
||
fieldRef:
|
||
fieldPath: status.podIP
|
||
|
||
尝试不同节点下的pod ping 失败
|
||
|
||
### 使用iptables重定向ip
|
||
|
||
把内网 IP `192.168.0.111` 转向外网 IP `123.123.123.123`
|
||
|
||
```sh
|
||
$ iptables -t nat -A OUTPUT -d 192.168.0.111 -j DNAT --to-destination 123.123.123.123
|
||
```
|
||
|
||
尝试将master节点和4090节点的内网IP均转为对方的公网IP。设置好iptables后4090可以ping通master的内网IP,但master不能ping通4090. 因为使用其他电脑也不能ping通4090,可能是4090的ping被禁止相应。尝试使用在master下的pod ping 4090的pod。失败
|
||
|
||
### 配置Raven
|
||
|
||
```
|
||
$ cat <<EOF | kubectl apply -f -
|
||
apiVersion: raven.openyurt.io/v1beta1
|
||
kind: Gateway
|
||
metadata:
|
||
name: gw-edge
|
||
spec:
|
||
tunnelConfig:
|
||
Replicas: 1
|
||
endpoints:
|
||
- nodeName: 4090
|
||
underNAT: true
|
||
port: 31998
|
||
type: tunnel
|
||
EOF
|
||
```
|
||
|
||
### 使用zerotier-one构建虚拟子网
|
||
|
||
使用zerotier-one在master和4090之间构建一个虚拟子网,并在添加边缘节点时指定**nodeIface**参数使得flannel和kubelet使用构建好虚拟子网后的4090上的虚拟网卡获取ip,这个ip位于虚拟子网中,从master节点可以直接ping通。
|
||
|
||
节点的flannel是如何指定使用哪个网卡的呢,查看k8s守护进程集中的kube-flannel,可以发现其启动执行命令为
|
||
|
||
```sh
|
||
["/bin/sh","-c","set -x\n\nif [ -e /etc/kubernetes/flannel/iface ]; then\n IFACE=`cat /etc/kubernetes/flannel/iface`\nfi\n\n/opt/bin/flanneld --ip-masq --kube-subnet-mgr --iface=$IFACE\n"]
|
||
```
|
||
|
||
其中iface参数制订了flannel使用的具体网卡,而这个参数可以通过`/etc/kubernetes/flannel/iface`设定,如果没有这个文件创建这个文件并向其中写入网卡名。
|
||
|
||
除此之外,对于使用vxlan模式的flannel,其vxlan构建时默认使用8472端口并使用UDP协议,而4090机器上只开放了31000-31999端口,因此可以在configmap中找到kube-flannel-cfg并修改其中的net-conf.json,修改后端backend添加配置Port并指定端口为31999端口,注意master主机的安全组中也要放行这个端口(UDP协议)。
|
||
|
||
```json
|
||
// net-conf.json
|
||
{
|
||
"Network": "10.61.0.0/16",
|
||
"Backend": {
|
||
"Type": "vxlan",
|
||
"Port": 31999
|
||
}
|
||
}
|
||
```
|
||
|
||
使用zerotier-one的过程比较简单,可以自建zerotier-one的服务,参考如下仓库
|
||
|
||
https://github.com/xubiaolin/docker-zerotier-planet
|
||
|
||
组网即可
|
||
|
||
其实zerotier-one底层也是使用wireguard,而raven和yurt-manager同样也可以使用wireguard,但默认是ipsec并且其默认的4500端口在4090上并未开放,因此主要问题就出现在端口未开放上。
|
||
|
||
### 阿里云VPN接入VPC
|
||
|
||
[建立VPC到本地数据中心的连接(双隧道模式)](https://help.aliyun.com/zh/vpn/sub-product-ipsec-vpn/getting-started/establish-a-connection-between-the-vpc-and-the-on-premises-data?spm=a2c4g.11186623.0.0.5d2f3f6fyHMLrS)
|
||
|
||
根据文档说明一步步操作。到步骤四,步骤四中给出的示例是使用思科防火墙的示例,在单机状态下当然不需要这个配置。可以使用strongswan配置vpn。找到strongswan配置的文档,阿里云使用的是swanctl来配置,而当前ubuntu apt安装的包默认使用starter和charon。因此根据文档
|
||
|
||
> When installing the strongswan metapackage, the legacy daemon and configuration backend are installed. To use swanctl/vici instead, install the charon-systemd and strongswan-swanctl packages and remove both the strongswan-starter and strongswan-charon packages. Make sure you only have either the charon-systemd or the strongswan-starter package installed (or at least disable one of the systemd units they install, which are strongswan.service and strongswan-starter.service, respectively).
|
||
|
||
```sh
|
||
sudo apt remove strongswan-starter
|
||
sudo apt remove strongswan-charon
|
||
|
||
sudo apt install charon-systemd
|
||
sudo apt install strongswan-swanctl
|
||
```
|
||
|
||
安装swanctl后,根据[strongSwan配置示例](https://help.aliyun.com/zh/vpn/sub-product-ipsec-vpn/user-guide/configure-strongswan?utm_content=g_1000230851)
|
||
|
||
注意这里有个坑点,安装swanctl后配置好swanctl的conf配置文件,连接阿里云的vpn连接不上,最后发现在双隧道模式下如果使用strongswan连接到同一台机器上,配置的双隧道的各项配置需要完全一样(密钥除外)。这样按照文档才能连接上,如果两个隧道某项配置不一样,就会出现密钥协商失败。
|
||
|
||
另外注意,如果配置的双隧道,则设置路由的时候一定要让本地机器去往vpc的ip的路由走主隧道对应的虚拟接口,如果走副隧道对应的虚拟接口会出现尽管本地机器可以Ping通vpn对应的ip,但vpc网络下的ecs无法ping通本地主机的情况。这里阿里云工程师给的解释如下
|
||
|
||

|
||
|
||
### 手动配置wireguard端到端连接
|
||
|
||
写好wireguard配置文件后使用wg-quick启动连接。
|
||
|
||
写一个监视脚本在服务出现问题时自动重启wireguard
|
||
|
||
```sh
|
||
#!/bin/bash
|
||
|
||
# 日志文件路径
|
||
LOG_FILE="/var/log/wg_monitor.log"
|
||
|
||
# 网站 URL
|
||
WEBSITE="https://poc-jinshu.truth-ai.com.cn"
|
||
|
||
# 记录日志的函数
|
||
log() {
|
||
echo "$(date '+%Y-%m-%d %H:%M:%S') - $1" >> "$LOG_FILE"
|
||
}
|
||
|
||
# 重启 WireGuard 的函数
|
||
restart_wireguard() {
|
||
log "正在重启 WireGuard..."
|
||
# 请根据您的系统配置修改以下命令
|
||
sudo wg-quick down wg0 && sudo wg-quick up wg0
|
||
log "WireGuard 已重启"
|
||
}
|
||
|
||
# 检查 wg0 接口状态
|
||
if ! ip link show wg0 &> /dev/null; then
|
||
log "wg0 接口不存在,正在重启 WireGuard..."
|
||
restart_wireguard
|
||
fi
|
||
|
||
# 检查 WireGuard 连接状态
|
||
if ! sudo wg show wg0 &> /dev/null; then
|
||
log "WireGuard 连接异常,正在重启..."
|
||
restart_wireguard
|
||
fi
|
||
|
||
# 检查网站状态
|
||
HTTP_STATUS=$(curl -s -o /dev/null -w "%{http_code}" "$WEBSITE")
|
||
if [ "$HTTP_STATUS" = "504" ]; then
|
||
log "网站返回 504 错误,正在重启 WireGuard..."
|
||
restart_wireguard
|
||
fi
|
||
|
||
echo "all normal"
|
||
```
|
||
|
||
使用crontab配置该脚本每3分钟自动运行一次,在crontab中添加以下配置
|
||
|
||
```sh
|
||
*/3 * * * * path/to/shellscript
|
||
```
|
||
|
||
## ingress-nginx-controller
|
||
|
||
> [!WARNING]
|
||
> ingress-nginx和nginx-ingress不相同,是两个不同的项目,对应的配置项自然也不同,阿里云k8s中使用的都是k8s社区自己维护的ingress-nginx,nginx-ingress由nginx社区维护。使用时要加以区分。
|
||
|
||
ingress nginx controller本质上仍然是nginx,因此许多配置也是基于此展开的,可以和nginx的配置结合起来理解。
|
||
|
||
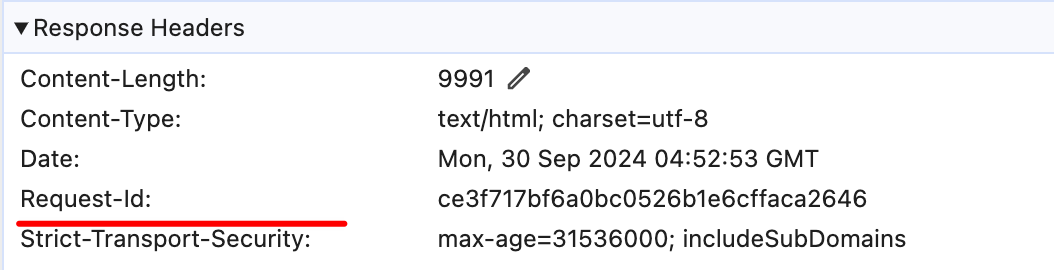
~~启动nginx-ingress-controller时需要增加启动参数以启用snippets功能,~~ 查询ingress-nginx的[文档](https://kubernetes.github.io/ingress-nginx/user-guide/nginx-configuration/configmap),可以看到ingress-nginx的configmap中可配置的项和说明,本质上仍然是nginx,所以像stream-snippet和http-snippet和server-snippet这样的配置项的含义需要和nginx中的配置模块对应起来。而在这里要做的是增加一个响应头,因在所有响应中都加入一个响应头,故用configmap中的location-snippet项,其对应的是nginx中的location块,向这个配置中写入代码等于向nginx中location块插入的配置代码。在响应中增加一个响应头表示request-id,用于跟踪每个响应的状态。插入的nginx配置代码如下
|
||
|
||
```nginx
|
||
more_set_headers "Request-Id: $request_id";
|
||
```
|
||
|
||
这里`request_id`变量在ingress-nginx中可通过设定配置项生成,设定`generate-request-id`项为true即可自动生成request_id。
|
||
|
||
|
||
|
||
## docker一键安装脚本及使用镜像
|
||
|
||
安装docker
|
||
|
||
docker官方提供了傻瓜式安装脚本,为你做好所有工作,免去了手动安装的繁琐。
|
||
|
||
注意是 docker compose 而不是 docker-compose. 执行命令时候也没有这个杠
|
||
|
||
> curl -fsSL https://get.docker.com | bash -s docker
|
||
|
||
可在此命令后附带--mirror参数设置镜像源,以提高国内服务器下载docker的速度
|
||
|
||
如使用阿里云镜像:
|
||
|
||
> curl -fsSL https://get.docker.com | bash -s docker --mirror Aliyun
|